And then it was done

Last week, on March 15, I graduated as valedictorian of my class at Neumont University with a bachelor’s degree in computer science.

During my two and a half years at Neumont I met a ton of people and made a lot of great friends.

The day after commencement I started my post college job as a software engineer with LiveAuctioneers.

I plan to discus Neumont more in the next few weeks.

Posted in Uncategorized | Comments Off on And then it was done

Show This PC icon on Windows 10 desktop

This PC

This PC

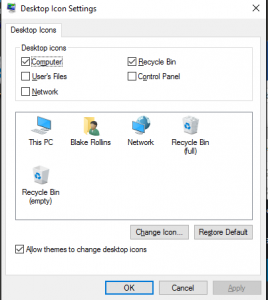
I know I love to have a “My Computer” or “This PC” icon on my desktop. Unfortunately every version of Windows makes it a little harder to find.

The way to open the Desktop Icon Settings windows that will allow you to enable the icon is to execute the following code in the Run Window:

rundll32.exe shell32.dll,Control_RunDLL desk.cpl,,0

Desktop Icon Settings

Desktop Icon Settings

Posted in Uncategorized | Comments Off on Show This PC icon on Windows 10 desktop

2016 Time for a new phone

Now that we have moved out of 2015 and into 2016 I have decided to upgrade my life a little bit.  (At least I really hope so)

I have had an iPhone ever since the iPhone 4.  Every year I have gotten the new upgrade until now.  For the last 5 months, I feel like my iPhone 6 has been my bane.  I feel like every day I have a new problem.  The largest of my issues is that the phone decides that its battery is dead at extremely random times.  Sometimes my phone is happy at 60% battery, but recently it has decided that 80% is just not enough.

So I have decided that 2016 is my time to lean in the other direction.  In fact, I chose not to compromise even a little.  I have jumped all the way from the left-sided iPhone to the right-sided Windows phone.

So Goodbye Apple:

Apple phone and watch

Apple phone and watch

And HELLO Microsoft:

Microsoft phone and watch

Microsoft phone and watch

Posted in Uncategorized | Comments Off on 2016 Time for a new phone

Google Time (My onsite Google interview)

I know it has been a little while ( a big while…), but here is my experience interviewing at Google.  Sorry that some of this telling is kinda vague because of the Nondisclosure Agreement.

I flew into the San Jose airport on Thursday afternoon where I picked up a rental car and had my first experience driving in California traffic. The drive to the hotel was about a 5-mile drive that took about 45 minutes. Although I had heard lots of stories about how driving in California traffic is stressful and difficult, I actually enjoyed it a lot. I got to the hotel and checked in. When I saw my room, it blew me away. I have not had a lot of hotel experience, but I know that this was a NICE hotel room; I mean it had a living room. I spent the evening watching Pluralsight videos (because that is what I do for fun)

The next morning I woke up, ate a biscuit and drove out to the Google campus. When I arrived, I met the recruiter that had been working with me through the process so far. She was very nice and she did a great job making me less nervous. She told me that throughout the day I would have five separate 45 minute long interviews, three before lunch and two after lunch. Then we chatted for a couple minutes until my first interviewer arrived.

During my first interview, I was super nervous. I think that I answered all the questions correctly though. I feel that in this interview, I did not do spectacular, but I also did not do too bad. Since it was the first one in the day, hopefully the interviewer gave me some bonus points.

My second interview was bad. There I said it; I did BAD. Fortunately for me, I did not realize that I did bad until I reflected upon it later. I received a question that was very easy. It was something that I had specifically practiced for and it was the only of the five interview questions that I received that day that I had actually been asked before. But like I said, I did BAD. For some reason I had a total brain fart here. During the interview, although I talked through all my reasoning and thought I knew the answer, I floundered for the full 45 minutes. A question that should have taken me 5 minutes to talk through was unsuccessfully answered at the end of my 45 minutes.

Like I said I was fortunate here because I didn’t realize how bad I must have looked until later that evening. Therefore, I moved on into my third interview of the day. The third interview went well (I think). The interview took the 45 minutes and we talked about many different things.

Next came lunch. Another Google employee met me and we talked about the culture at Google. I told him I wasn’t super hungry so we ate quickly and then I got a tour of the campus. I was enthralled by the aura. I felt amazing. This was the first time that I felt that everyone around me is super smart and they could all help me learn new things.

After lunch, I had my two final interviews. I felt good during both of them and I think that the interviewers enjoyed their time as well. I don’t really have much more to add, I just think they went well.

And that is pretty much the story.  After the final interview, I returned to my hotel with a pizza and spent the rest of the night watching more Pluralsight 😉

Posted in Uncategorized | Comments Off on Google Time (My onsite Google interview)

Email Unsubscribe Ranting

I want to complain about the current unsubscribe process that some email has.  About once a month I log on to my GMail account and click the unsubscribe link at the bottom of the emails that I don’t care about.  During my monthly process I make sure not to click on SPAM links of acknowledge my existence to unknown services.

This week I decided that I was unhappy with some of the emails.  Most of the mail I get has a casual and friendly “just click here to unsubscribe” and they don’t even ask for an email address.  The internet in 2015 is smart enough that it knows who you are any time you open a webpage or click on an email.  I understand this and happily take my part.  I know that there are about twenty email addresses that make it into my primary GMail mailbox, and I don’t want the responsibility or work associated with unsubscribing from all my email.

So, to the point.  I have recently signed up for the 7-11 rewards program.  This program allows me the get a free drink after I purchase 7 of them.  (#regards to 7/11 for giving me something after 7 instead of 10 purchases).  Anyway, during my unsubscribing process this month I noticed that the 7/11 unsubscribe link acted like a 2008 link.  It accepted my request and said (my paraphrasing) “We will make sure that we don’t email you anymore, but this may take up to two weeks”.

I accepted the response and moved on… until I noticed that since that unsubscribe request, I have received 3x more email from them.  I mean come on.  It has been less than one day, but I have gotten four emails.  Clearly you have received my request and then adjusted your email rate.  Unfortunately the adjustment went up.  7/11 stop listening to customer requests and then totally reversing what they want.

Posted in Uncategorized | Comments Off on Email Unsubscribe Ranting

Google phone interview follow up

Unfortunately (for my ego) I have underestimated myself.  Two days after my phone interview with Google, I received an email from my first recruiter.  She told me that in the future I would be talking to a new recruiter that had been CC’d.  I took this is my normal sub-optimistic manner and assumed that this first recruiter just didn’t feel like saying NO to people and that they had a friend that liked saying NO!.

I thought this because my usual self might try to avoid having to reject a person and instead allowed another, more ‘nihilistic’ person to to it.  (well thinking back, I wouldn’t really make another person send a rejection for me.  I would definitely Man Up and do it myself; I think.)   Anyway, after another few days, and a weekend, I received an email telling me about the Google interview process from my new recruiter.  Unfortunately I was away from my phone for this weekend so I did not know that I had a response until the next Monday.  On the Monday I read my response and thought that this seems positive (remember that I have a pessimistic inner-self) but I still haven’t heard that I have done well.  So I phoned a couple friends that I know have interviewed with Google and they all said that if it was a No, then I would Know (haha a pun).

So, I followed up and I got an onsite interview at the GooglePlex.  Now I have two and a half weeks to study and worry before I get to fly on an airplane ;).  I have flown before, but I have realized that it has been almost 5 years since then.  I will let you know what happens!

Posted in employment, me | Comments Off on Google phone interview follow up

An interview with Google

A few weeks ago, I decided that I needed to start writing my blog again.  I have not done a good job because in the last month.  I have written exactly zero posts.  Here goes my second attempt of starting up the blog this year.

Today I had a job interview with Google.  I do not have a lot of interview experience in fact this was my fourth real job interview I have ever had, so I was excited.

As some background information about the Google interview process (as much as I know).  There are usually 1-2 technical interviews over the phone.  The phone interviews last for 45 minutes where the interviewer asks between one and three questions.  If the interviewer(s) like you enough, they send you out to the GooglePlex to have some hardcore interviews.

The interview that I had was a 45-minute technical interview over the phone.  I will start by saying that I do not feel that I did exceptionally good in the interview.  I do not feel as if I really did good or bad.  I mean, I did both, but neither was overwhelming.

I was extremely anxious when the interview started.  In fact, I felt anxious for the preceding 27 hours as well, starting at about 8:00 AM the day before.  I am not sure why I was so nervous, because I felt very confident about my knowledge.  Anyway, my nervousness was apparent at the start of the interview.  We started our discussion with me introducing myself and explaining what I like about Google and why I want to work there.  I feel that because I was nervous, I rambled a little bit during this phase.  My answers were along the lines of me liking google because they have the ability to help many people and they were the first person to challenge Microsoft and try to make the entirety of computing a better place.  I also explained that one of the ways they had done this was with the Google Apps / Google Docs services making collaboration so much easier than it has ever been.

After my ramble, my interviewer asked me my first technical question.  I am not going to say exactly what it was, because Google has asked me not to.  The question was pretty simple recursion with the only requirement that I could only write one method.  I felt very confident and said I understood what was asked.  I received some method stubs told that I should just expect to work and told which method to start writing code in.  I started down the path of recursing with a Stack and explaining what I was thinking.  After about 5 minutes my interviewer said, “You don’t need to use that Stack, I said you could write one additional method”.

Crap.  I had misunderstood the question.  I thought that I could write only the one method that was stubbed out…  I wasted six or seven minutes coding up a simple problem because I was dumb, then worse (I think now) I deleted my work and did it the other way.  Unfortunately for me, my research has taught me that one of the most important things to do in a Google interview is to ask for clarification and not code until you understand.  I changed the way I was writing my code and finished up the problem.

When my interviewer was satisfied, he asked me about debugging some different things and what additional code I would add to a problem to make it traceable.  I felt like I gave some reasonable answers and talked out my reasoning.

When I was finished with the debugging, the interviewer told me that I was done with his questions and that there was only about 14 minutes left and we did not have time for any more questions.  I was bummed because I felt like I could have turned the interview around with one more question.  We spent the next 10 minutes chatting about culture and company life at Google before my time was up.


The takeaway: I feel like this interview was good for me.  I do not think that they will call me back this time but I did learn a lot.  I learned that there is NO reason to be nervous.  I wanted to succeed.  The interviewer wanted me to succeed.  The recruiter that emailed me earlier wanted me to succeed.  EVERYBODY wants me to succeed.  I now have another job interview under my belt and I will take this experience with me for the next time Google lets me try and any other company that will give me a shot.


Posted in employment, me | Comments Off on An interview with Google

Blogging again

I need to start blogging again.  I used to try to share my IT knowledge at “theitguyrox” blog, but I changed careers and unfortunately the blog fell by the wayside.

Anyway, I want to try and contribute again, so I am going to try to write here at least one time a week.  But, I am going to shift toward more development and a little less IT, because of the career switch.

Posted in me | Comments Off on Blogging again

Migrate from BlogEngine.NET to WordPress

I just had the opportunity to migrate or company blog from BlogEngine.NET to WordPress. It was not fun, or easy so thought I would share it with you.

There are a few things to note with this process.  Following these steps will import Posts, Authors, Categories, and Comments.  It will not migrate tags.  The conversion script I wrote will give you a list of tags that were associated with each post for you to manually fix later.


Step 1 – Export the data:

We need to export your current blog information.  To do this, log in to your existing BlogEngine.NET Blog.  Open Settings and at the bottom under Import & Export Click Export.

1

Save the BlogML.xml file to a location you will remember.


Step 2 – Convert the data:

Run my conversion script to make the BlogML file compatible with WordPress.

Download the BlogEngineToWordpress import script from My Downloads Page.  This script needs a few lines at the top changed before use.

Open the script and in the Config section, set the following to match your environment:

BlogEngineExportFile: The path to the BlogML.xml file that we downloaded earlier.

outputFolder: The path where you want the new files to go.

blogDomain: The URL that points to your blog.

imageURLPrefix: This path will be appended to blogDomain and will point to all the image files that will be imported to wordpress.

postURLPrefix: This path will be appended to blogDomain and will point to all the posts that will be imported to wordpress.

spacesInTab: The number of spaces in a tab.  I use this when I create the redirect rules that I will add to the web.config file in IIS.

Save the changes you have made and run the script at a command prompts as cscript BlogEngineToWordpress.vbs.

Note: This is not a perfect script.  There are still some things that may go wrong.  If there are weird symbols or incorrect html in the existing posts, the script will fail. 

If this happens, open the WPImport.xml file, scroll to the bottom, and see what post failed.  Then open the BlogML.xml file, find the bad post and fix the issues.  (Usually removing weird symbols that notepad cannot understand).  Save the files and try again.

If you need help trying to find out what is wrong, you can set the variable enableDebuging to true in the Config section.  This may help if you want to dig into the code a little bit.

If you still cannot get past a problem post, I recommend deleting the data between the <![CDATA[    ]]> tags in the BlogML.xml file.  This way you will still migrate the post to the new system, it will just be blank.  You can then edit that post in the WordPress UI add re add the text.

After a few bad posts that I had to fix, 8 out of about 900 for me.  I finally saw the end of the script.

The script created 6 files.  They are:

postsAndTags.txt – A list of the old URL to each post and the tags that were associated with it.

redirectFile.txt – A comma separated list of the old and new urls.

redirectNeedsFixedFile.txt – A comma separated list or URLs that I was unable to fix.  (You will manually have to update these)

web.config_partial – The list of rewrites you will need to add to the web.config file in IIS if you want to use rewriteMaps.

web2.config_partial – The list of rewrites you will need to add to the web.config file in IIS if you want to use redirectRules.

WPImport.xml – A WordPress compatible import file.

If redirectNeedsFixedFile.txt is empty then you are done with the conversion step and are ready to skip to Step 3 and importing the data.

If your redirectNeedsFixedFile.txt is not empty we will need to address this.  I have 11 urls in this list, most of them pointing to “Pages” on the old blog.  I don’t use pages so most of these can go.

1- /Blog/admin/Pages/www.groupon.com,/needtofix/page//blog/admin/pages/www.groupon.com

This is line 1 for me.  the left hand /Blog/admin/Pages/www.groupon.com looks like a malformed url.  I want o be certain though so I opened it in a browser.  I got a 404 Page Does Not Exist error.  Now I need to fix the import data.

Open WPImport.xml and search for the string on the right

/needtofix/page//blog/admin/pages/www.groupon.com

I found only one occurrence and it looked like a link to http://www.groupon.com”> so I updated it.

2 – /blog/,

Line 2 is a special one.  I think every site will have one of these.  This is saying that the old site had a link to /blog/, but every link on my blog will have this because it lives in a subfolder on my site.  I can ignore this one.

3 – /Blog/?tag=/saving+money,/needtofix/tag//blog/?tag=/saving+money

Line 3 is a link to a list of tags.  When I wrote this script, I did not add the ability to update URLs that point to tags or pages. I didn’t need to feature and I was in a time crunch.  If you have many URLs in this list because of links to tags or pages, leave a comment and I will try to update the script soon.

If you don’t have many links like this you can manually update them.  Search for the string to the right of the comma in the WPImport.xml file and update it accordingly.

4 – http://www.rollinzrox.com/blog/,/needtofix/other/http://www.rollinzrox.com/blog/

Line 4 is a link to another blog.  The way I fix URLs caught this one and placed it in my other broken URL list.  I have to manually set this back to the way it was.  In WPImport.xml replace the text to the right of the comma with the text on the left of the comma.


Step 3 – Import the data:

When we are finally done converting the data, we need to import it into WordPress.  Here is what we need to do:

Download the BlogML importer plugin for WordPress from http://wordpress.org/extend/plugins/blogml-importer/

This is a plugin written by Aaron Lerch.  You can read about his experiences changing blogging platforms at aaronlerch.com

Log into your new WordPress Blog.

Open Plugins and then Add New.  Click on the Upload link at the lop and point it to the zip file you just downloaded.

Click the Install now button.

Click Activate Plugin.

Go to the Tools –> Import screen and Click on BlogML

If your WPImport.xml file is large than 2 mb we will need to increase the upload size in our php.ini file.  I am doing this on a self hosted machine that I control so the process might be a little bit different for you.

Open your php.ini file and change the following two lines:

upload_max_filesize = 10M

post_max_size = 10M

Now restart IIS and upload the WPImport.xml file

It will take a little while to upload depending on your internet speed.

After the file completes the upload, the plugin asks about importing users.  You have the ability to import all the old users or to map them old users to new ones.  Make you choices and click Submit.

The data is now importing into WordPress.  This will take a while if you have many posts.

After a healthy amount of time, you will see a page with a (possibly) long list of post titles.  When you see this, you can be happy because you know that the data import to WordPress is now done.

Return to your dashboard and see the results of the data import.


Step 4 – Move the media:

Now you have all the posts and authors and comments moved over, but now pictures.  We will need to manually copy the pictures and other media to the new blog.

You will need to copy all the files out of the BlogEngine media folder (for me this was at C:InetpubBlogEngine.NETApp_Datafiles) into the WordPress uploads folder.

The location in the uploads folder depends on the path you set in the conversion script.  The variable imageURLPrefix set the path.  I wanted the content to be located in wp-content/uploads/1000/01.

Copy the files and check the posts on the blog.  Verify that WordPress can find the files.


Step 5 – Add new media to Media Library (Optional):

This step is optional.  After you copy the images to the WordPress uploads folder, all the posts will be able to see them correctly, but they will not be accessible via the WordPress UI.  If this bothers you, there is a plugin available that will allow you to import the files and you them with the WordPress media manager.

(This plugin will also bulk up the folder that contains the images.  The plugin creates 3 additional copies of each file, each with a different size.)

Download the plugin from http://wordpress.org/extend/plugins/add-from-server/ and add it the same way we added the BlogML import plugin.

Activate the plugin.

On the page with the Plugin list, click ………

Browse to the files that you want to add (this took a while to list them all for me.  A popup from IE kept asking me if I wanted to stop a script that was slowing down the webpage.  I repeatedly clicked No, Don’t stop the script.)

Check the boxes next to all the files and click Import.


Step 6 – Redirect rules:

Now we have one of the most important parts of the migration.  We need to add all the redirect rules to IIS so we don’t look bad to search engines.

Decide if you want to use an individual redirect rule for each URL or if you want to use a rewrite map.  I chose to use a rewrite map because it is smaller.

Open up you web.config file for your WordPress site and add the text from the web.config_partial (or web2.config_partial) file that was created by the conversion script.

Insert the text after the first <rewrite> tag, but before the first <rule> tag.

If you choose the redirectMap, you will also need to add this rule before the default WordPress rule:

<rule name=”WP Redirect Rule” enabled=”true”>
<match url=”.*”/>
<conditions>
<add input=”{StaticRedirects:{REQUEST_URI}}” pattern=”(.+)”/>
</conditions>
<action type=”Redirect” url=http://www.myblog.com{c:1} redirectType=”Permanent” appendQueryString=”false”/>
</rule>

Save your web.config file.  If your web.config file is larger than 250kb we need to edit the registry to increase the allowed size.

Open regedit and add the following DWORD value to HKLMSOFTWAREMicrosoftInetStpConfiguration and

HKLMSOFTWAREWow6432NodeMicrosoftInetStpConfiguration

DWORD “MaxWebConfigFileSizeInKB” = Decimal “1000”

(You may have to create the Configuration Key as well.)

After editing the registry,  you will need to reboot the server.

After the reboot, (or after editing web.config and not needing to reboot)

Browse to one of the old URLs to verify the redirect.


Step 7 – Add tags and fix any other issues:

Unfortunately the conversion scripts do not add the tags to all the posts for you.  We have to manually do that now.  Open up the pastsAndTags.txt file and browse to the main page of your blog.  Manually edit each post and edit the tags.  This may take a while, but I think it is worth it to verify that everything is working.

During this time you can also check that all the images work.  Some images I had were broken because BlogEngine.Net passes in files with spaces in the name with a + icon.  I had to edit the links to any pictures with a + in the name to point to the right place.


Done:

Well, that is all I can think of right now.  I will update the post if I can think of anything else.

Posted in Uncategorized | Comments Off on Migrate from BlogEngine.NET to WordPress

My Evening with NTDS Replication Event ID 2095

I had a wonderful night this week, I thought I would stop by my office and pick up a hard drive on my way home from dinner.
When I arrived at work (about 10:00pm) I logged into my desktop and glanced at my email. I had recieved one from myself about a week earlier about moving Exchange Server 2003 data to another hard drive.
I thought that since it is 10:00pm, I could hurry and do the data move and be on my way. All the servers in this particular environment are running as Virtual Machines. I started by backing up the Exchange VM by copying the VHD file.
I figured that I could just copy it back into place if there were any problems and deal with the data move later.

So after backing up the exchange Server VHD, I booted the server and started the Exchange Data Move. After I got done moving the databases, I opened up my Outlook
And noticed an error. I could not POP3 my email anymore. I logged back into the Exchange Server and check the event logs, and the services to see why I couldn’t POP3 my email. I verified that I could use the Outlook Web Access. I could even send
email using outlook, just not POP3. By now it was almost 11:00pm so I decided to just restore my backup and attempt the data move on a later date.

I shutdown the exchange server and copied the old VHD into place. I turned on the exchange server and noticed that it took a lot longer to boot than normal. I tried to remote into the machine
and I got an error saying that ‘The RPC server is too busy to complete this operation. Please try again or consult your system administrator.’. I thought that was bad so I logged in through the console.

Once I got logged in, I got a popup saying that a service failed to start. I opened the event log and my heart dropped. I saw more event logs than I expected. I didn’t realize that the Exchange Server was also a Domain Controller.

I looked in the Directory Service Event log and saw 2 errors, NTDS Replication Event 2095 and NTDS Replication Event 2103.

[code lang=”text”]
Event Type: Error
Event Source: NTDS Replication
Event Category: Replication
Event ID: 2095
Date: 2/10/2010
Time: 1:16:27 AM
User: NT AUTHORITYANONYMOUS LOGON
Computer: EMAIL-Server
Description:
During an Active Directory replication request, the local domain controller (DC) identified a remote DC which has received replication data from the local DC using already-acknowledged USN tracking numbers.
Because the remote DC believes it is has a more up-to-date Active Directory database than the local DC, the remote DC will not apply future changes to its copy of the Active Directory database or replicate them to its direct and transitive replication partners that originate from this local DC.
If not resolved immediately, this scenario will result in inconsistencies in the Active Directory databases of this source DC and one or more direct and transitive replication partners. Specifically the consistency of users, computers and trust relationships, their passwords, security groups, security group memberships and other Active Directory configuration data may vary, affecting the ability to log on, find objects of interest and perform other critical operations.

To determine if this misconfiguration exists, query this event ID using http://support.microsoft.com or contact your Microsoft product support.

The most probable cause of this situation is the improper restore of Active Directory on the local domain controller.

User Actions:
If this situation occurred because of an improper or unintended restore, forcibly demote the DC.
Remote DC:
0bbec9e0-b956-4120-b347-ee82bad53363
Partition:
DC=MyDomain,DC=com
USN reported by Remote DC:
192575
USN reported by Local DC:
188453

For more information, see Help and Support Center at http://go.microsoft.com/fwlink/events.asp.
[/code]
[code lang=”text”]
Event Type: Error
Event Source: NTDS General
Event Category: Service Control
Event ID: 2103
Date: 2/10/2010
Time: 1:16:27 AM
User: NT AUTHORITYANONYMOUS LOGON
Computer: EMAIL-Server
Description:
The Active Directory database has been restored using an unsupported restoration procedure.

Active Directory will be unable to log on users while this condition persists. As a result, the Net Logon service has paused.

User Action
See previous event logs for details.

For more information, see Help and Support Center at http://go.microsoft.com/fwlink/events.asp.
[/code]

I instantly shutdown both the exchange server and my primary (And apperantly not only) Domain COntroller. I made a backup copy of each.
I started googling the error. Now it was 1:20am.

I came accross a couple of promising links. After about 10 minutes, I came up with an action plan.

  • 1. Shutdown DC 1
  • 2. Demote DC 2 (DC showing the error) using ‘dcpromo.exe /forceremoval’
  • 3. Shutdown DC 2
  • 4. Boot DC 1
  • 5. Sieze all roles that were owned by DC 2
  • 6. Boot DC 2, then Promote it.
  • 7. Be happy because it is all over.

Since I had backups of both of the VMs, I decided to follow my plan. I hit my big problem on step 2. I kept getting wierd errors during the demotion process. After some more googling, I found out that
installing Exchange Server on a Domain Controller is a Stupid, Stupid, Stupid Idea. Once you install, you can never uninstall, and that situation is not supported by Microsoft.

After I read that last tidbit I got extremely worried. I did NOT want to open a ticket with Microsoft to fix my stupid person problem.

I sat and worried for a minute and thought through the whole situation. Why am I trying to demote the server with exchange. If this was an environment where the other domain controller (DC 1) had died, I should
just be able to sieze the roles with the other Domain Controller (DC 2) and keep going. The only problem that I could see if I proceeded to demote the healthy domain controller is that the Exchange Server (DC 2) already knew
it had an unsupported restore. There had to be a way to fix that.

After my next session googling, I had a new plan:

  • 1. Shutdown DC 2 (Exchange Server).
  • 2. Demote DC 1 using ‘dcpromo.exe /forceremoval’.
  • 3. Shutdown DC 1.
  • 4. Boot DC 2.
  • 5. Make DC 2 think that it has a writable copy of the Active Directory Database. (Only required if You are keeping the DC that detected Database Discrepancy.)
  • 6. Remove AD Remenants using ntdsutil.
  • 7. Sieze all FSMO roles that were owned by DC 1 (In this case all of them).
  • 8. Boot DC 1, then Promote it.
  • 9. Re-add all FSMO roles that you would like DC1 to have.
  • 10. Be happy because it is all over.
  • 11. Next morning, fix all the things that you forgot.

Step 1 – Shutdown DC2 (Exchange Server)

This one is pretty easy. In fact if you can’t do it. You better open that ticket with Microsoft right now.
Click Start->Turn Off. Select Shutdown and type in a reason.

Step 2 – Demote DC 1 using ‘dcpromo.exe /forceremoval’

Step 2 isn’t very hard, it just freaked me out a little because I was doing it at 2:25 am.
Click start->run. Type dcpromo.exe /forceremoval. Follow the prompts.

Step 3 – Shutdown DC 1.

Once the Domain Controller has rebooted after it’s demotion, follow the instructions in step 1.

Step 4 – Boot DC 2.

Step 4 can vary depending on your environment. It could be pressing the power button on the front of the server,
or in my case, Clicking the ‘Turn On’ link in the Virtual Server 2005 UI.

Step 5 – Make DC 2 think that it has a writable copy of the Active Directory Database.

Log into DC2 (the Exchange Server). open the registry editor (Start->Run and type ‘regedit’).
Remove the value ‘HKEY_LOCAL_MACHINESYSTEMCurrentControlSetServicesNTDSParameters “Dsa Not Writable”=dword:00000004’
Do not just delete the 4, Delete the whole value.

Step 6 – Remove AD Remenants using ntdsutil.

I found the help for this one on MSDN.
Open a command prompt on DC2 (Exchange Server).

Type ntdsutil and press enter.
Type metadata cleanup and press enter.
Type Connections and press enter.
Type connect to server server and press enter.
Type quit and press enter.
Now you should be on the metadata cleanup menu.
Type select operation target and press enter.
Type list domains and press enter.
Type select domain number and press enter.
Type list sites and press enter.
Type select site number and press enter.
Type list servers in site and press enter.
Type select server number and press enter.
Type quit and press enter.
Now you should be on the metadata cleanup menu.
Type remove selected server and press enter.
You may have to click ok at some dialog boxes confirming that the current domain controller will need to assume roles that have no owner.
Type quit and press enter until you disconect.

Step 6.5 – Clean DNS (If you are using windows DNS)

Open DNS MMC, Delete the A record for DC1.
Delete the CNAME record under the _msdcs container.
If DC1 was a DNS Server remove the Name Server reference by Right-clicking on the Forward Lookup Zone, selecting Properties, and removing the server from the Name Servers tab.
For good measure, I expanded every section in the DNS MMC and removed every reference to DC1.

Step 7 – Sieze all roles that were owned by DC 1 (In this case all of them).

Article on MSDN.

Step 8 – Boot DC 1, then Promote it

For Step 8, I was working with Virtual Machines, so instead of just repromoting DC1, I just built a new VM from Scratch.
I copied one of my Base-Windows2003 VHDs, ran NewSid. And ran dcpromo.exe.
Before I could Add the new DC, I needed to log into DC2 and run:
repadmin /options -disable_inbound_repl
repadmin /options +disable_inbound_repl
repadmin /options -disable_outbound_repl
repadmin /options +disable_outbound_repl

Step 9 – Re-add all FSMO roles that you would like DC1 to have.

Step 10 – Be happy because it is all over.

It was 4:00am when I was finished with my excursion. Hopefully yours doesn’t take so long since I have offered you this guide.

Step 11 – Next morning, fix all the things that you forgot.

Step 10 should really be Step 7.5, but I didn’t know what I forgot to do until the next morning.
Not only reinstall DNS on DC1, but make sure that the Forwarders are configured properly.
(Open DNS MMC, Right-Click on ServerName, Properties, Forwarders Tab.)
Install any shared printers, or enable any file shares that previously existed (Preferably with the same names so you don’t have to change any client computers.)

Well that is the story of my NTDS Replication ID 2095. Hopfully your will go by alittle bit smoother because of this.

Alot of my help came from exchangeserverpro.com.

Posted in Uncategorized | Comments Off on My Evening with NTDS Replication Event ID 2095